Deploy your web applications


Introduction


Several times we encounter a great and sophisticated web or desktop application
that does not poses it's appropriate market share just for the reason of poorly
written SETUP package and poorly designed deployment strategy. The fact is simple:
If your users are not able to easily deploy your application then whatever sophistication
or features you  provide, they will be unable to even experience your application
from the very first place!


Your Ad Here border="0" />


In this tutorial we are going to show you a set of techniques by which you can package
and deploy your web applications .....


Alternatives


When it comes to web applications specifically, then you will encounter many techniques
that can be utilized as a deployment strategy for your web application:


XCOPY Deployment


The most trivial technique is to simply copy your web application files to the production
server hard drive and set a virtual directory there. The setting of a virtual directory
is needed by several deployment schemes and can be achieved from Internet Information
Manager Microsoft Management Consol (MMC snap-in). Because developers typically
use the command line order 'XCOPY' to implement this technique, this technique is
typically referred to as XCOPY Deployment.


Copy Web Site


Copy Web Site is a new technique provided in ASP.NET 2.0 and Microsoft
Visual Studio 2005 (Available from the Website / Copy Web Site... Menu option).
Although this technique is performed from inside Visual Studio (in contrast with
the XCOPY deployment technique which is performed from outside Visual Studio), there
is no compilation performed at all. All your pages are still in their source code
form on the production server. Some developers see this fact as a high risk on their
intellectual property. Two extra disadvantages of this technique (and in fact any
other technique that does not involve any compilation before deployment) are reduced
error checking and the slow initial page load.


The reduced error checking is a direct result to that no compilation is performed
and hence some errors may be discovered by your users later. The initial page load
slowness is also because nothing is compiled yet and the entire web application
has to be compiled at the time the first page is being requested. An advantage of
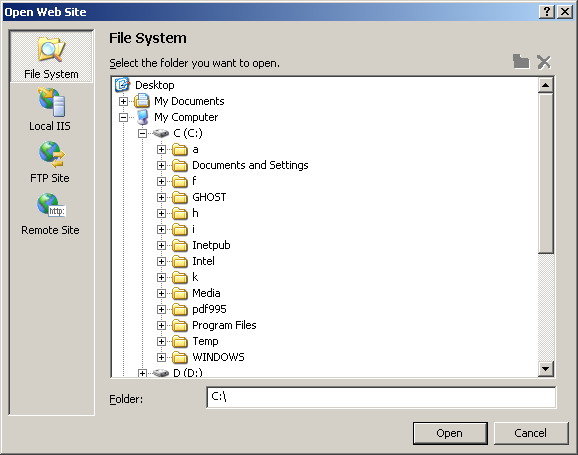
this technique over the XCOPY deployment is that you have the options to deploy
to the File System, the Local IIS, the FTP Sites, and the Remote Sites. Please see
figure 1.


Your Ad Here border="0" />


width="578" />


Figure 1


Pre-compilation


All of the deployment methods we mentioned so far suffer from the fact of that no
compilation is performed along with the disadvantages that comes as a direct result
from this fact. To ensure fast page load and some protection of your source code,
you should pre-compile your web site before deployment.


Pre-compilation can be performed in-place by just adding '/Deployment/Precompile.axd'
to the root URL of your web application and opening the resulting URL in Internet
Explore.


Pre-compilation can also be achieved using the command line compiler 'aspnet_compiler'.


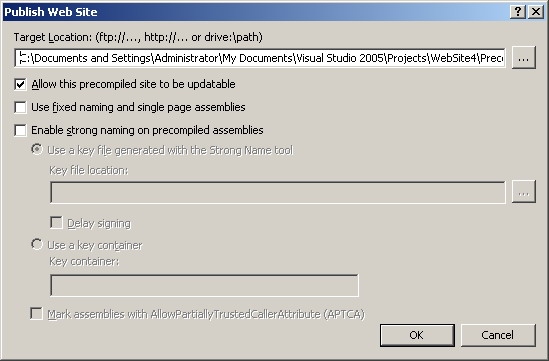
Using Microsoft Visual Studio 2005 you can still perform pre-compilation from the
'Build / Publish Web Site' menu command. Please see figure 2.


width="549" />

Figure 2


SETUP Projects


Your Ad Here border="0" />


It's always desirable to package your web applications such that they are easy to
deploy on the production server. Microsoft Visual Studio 2005 gives you this rich
packaging option for free ... Just follow the following instructions ...


First of all you need to know that our target is to create a package (and MSI file)
that contain our web application in a form that can be later easily deployed on
the final production server.


Let's start by selecting 'File / New / Project' in Microsoft Visual Studio 2005.
This will present you the famous set of possible project types from which you will
select 'Other Project Types / Setup and Deployment' then you will select the 'Web
Setup  Project' icon from the side to the right. See figure 3.
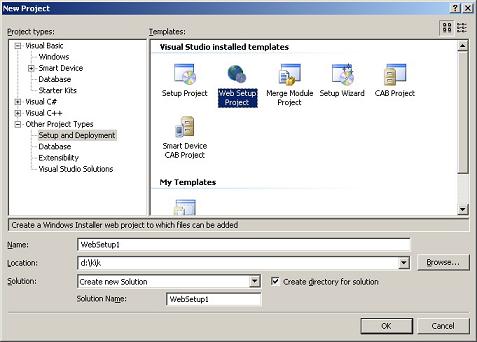


Figure 3


In figure 3, set the appropriate project name and folder options then click OK.


You can always have the same behavior by adding the SETUP project above to your
web application solution instead of creating a new separate solution. You can achieve
this by selecting  'File / Add / New Project' instead of 'File / New / Project'.
This way you will have a self contained web solution. The 'File / Add / New Project'
method is much more recommended.


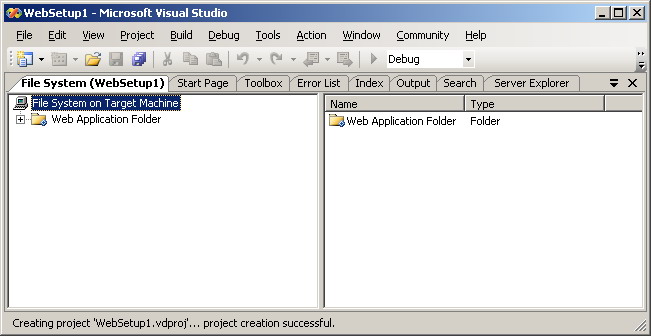
Your setup project will then open as in figure 4 below:


width="651" />

Figure 4


You will then need to add your web application files to the SETUP project we are
developing now. This can be achieved by right clicking your SETUP project name in
solution explorer and selecting 'Add / Project Output'. Please see figure 5.
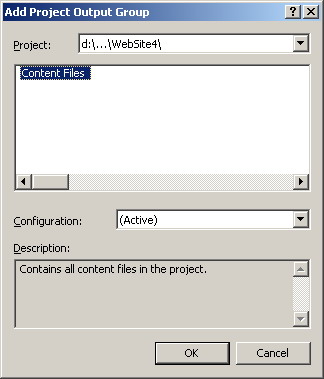


width="324" />

Figure 5


To tune the properties of our SETUP project, we will need to press F4 while it's
name is selected in the solution explore. This will bring the SETUP project's properties
window. Several useful properties can be set in this window:


Property


Purpose


Author, Description, Manufacturer, ManufacturerUrl, ProductName, Subject, Title,
and Version

Use all of these properties to identify / describe your application and yourself.

AddRemoveProgramsIcon

Here you can specify the icon to be displayed beside your application in Windows
Control Panel's Add Remove Programs.

DetectNewerInstalledVersion

Specify here whether or not a check is to be performed to determine the existence
of a new version already installed of your web application.

RemovePreviousVersions

Specify here whether you need an older version of your web application to be removed
if a newer version is being installed.

RestartWWWService

Some web applications requires the Internet Information Service to be stopped and
then restarted after the deployment of the application. Use this property to control
such behavior.


The last and most important step is to actually build our SETUP project. This cane
be achieved by right clicking the name of our SETUP project in the solution explorer.
It's this specific step that creates the MSI package / file mentioned above. This
is the file you will need to distribute to your users and this is the file they
will use to deploy the web application on their production server.


It's worth mentioning that the actual deployment process will be some what similar
to the SETUP of any typical desktop application (with some exceptions of course).
One of the many similarities is that the web application after deployment will automatically
appear in the 'Add / Remove Programs' window of Windows Control Panel.


Your Ad Here border="0" />


For your users to deploy your web application they will just need to double click
the MSI file. This will produce something similar to figure 6:
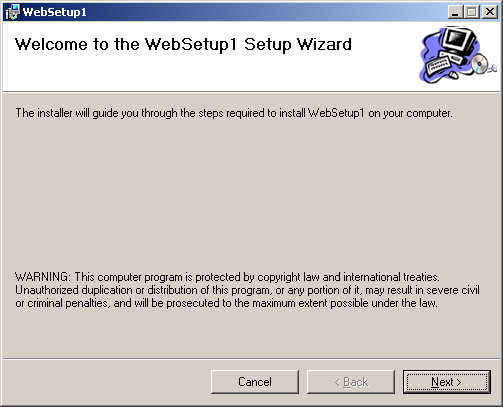


width="503" />

Figure 6


Protection and obfuscation of .NET executable files (.exe, .dll,...)


You must know that every of your .NET products, web application or ASP.NET custom
control, can be easily decompiled. Practically every user can get your source code
by using some free .Net decompiler. If your license doesn't include source code
it is not enough to just exclude source code files from installation. You need additional
protection.


After long analyze, we decided to use rel="nofollow" target="_top">Spices.Net for protection of all products of
Bean Software. Even if you can't afford complete suite, consider at least their
Obfuscator. Later, I discovered rel="nofollow">.NET Reactor which also looks good and it is about ten times
cheaper :). You can check Product Comparison link on NetReactor site where it is
compared to some other products, it looks really impressive, and not only in price
issue.


For further information


Refer to the online copy of Microsoft Developers Network at
http://msdn.microsoft.com
or use your own local copy of MSDN.

Writing an ActiveX control in C#

Published: 20 Apr 2007
By: Imran Nathani

An ActiveX control is an object that supports a customizable programmatic interface. Using the methods, events and properties exposed by the control, web developers can automate their web pages to give the functionality which is equivalent to that of a desktop application.

Introduction

As web application developers, we want to give our users a highly functional application. We want to provide our users with functionality like printing streams, local socket programming ,local threading, cross domain scripting etc., but as we know that due to the disconnected architecture of the Internet and security restrictions of any standard browser, this task becomes difficult. That's when the ActiveX comes to the rescue. This is mostly for web applications where the users would not be apprehensive about doing a one time installation of the component. Also, in an intranet application these components can be a big boost to the functionality of the application.

Writing ActiveX Class in C#

We will first write an interface called ASignatures which holds the signatures of the methods and properties. These methods and properties can then be accessed via JavaScript at the browser level. By default all members of an interface are abstract and public. The main ActiveX class AClass will inherit from this interface. Above the main ActiveX class we will mention the ClassInterfaceType as AutoDual. This will indicate the type of the interface generated for the main class which will automatically be generated and exposed to the COM. Normally AutoDual is not recommended because it has some versioning limitations. We will use the ClassIntrefaceType as AutoDual because the purpose of this code is instructional. In the main class we will write two methods FName(), and SName() and one property Age. In our example we will return the basic datatypes but this can be implemented for complex datatypes too.

using System;

using System.Runtime.InteropServices;
namespace ANamespace
{
public interface ASignatures
{
string FName();
string SName();
int Age { get;}
}
[ClassInterface(ClassInterfaceType.AutoDual)]
public class AClass :ASignatures
{
public string FName()
{
return "Imran";
}
public string SName()
{
return "Nathani";
}
public int Age
{
get { return 24; }
}
}
}

Compiling the ActiveX control

For those who do not know how to compile out of Visual Studio IDE, you need to search for the c# compilercsc.exe in the folder:

\WINDOWS\Microsoft.NET\Framework\v2.0.xxxxx

Place your AClass.cs file in the folder where the csc.exe exists. Then by command (DOS) interface go to that particular folder and execute the following command:

csc /t:library AClass.cs

Registering the Assembly with the client

You can register the assembly in multiple ways of implementation and it mostly depends on the target users. For example, creating a setup file for download or having a self extractor file which could prompt in the browser, depends totally on the functionality requirement. However for our example we would register the assembly by using the command prompt which is the easiest and could be done by a batch file too. Therefore, in same folder as above immediately after the compilation step we execute the following command:

regasm AClass.dll /tlb /codebase

Also we must note that the .NET Framework needs to be installed on the client for registration and working.

Using the ActiveX control

We can then access our newly created ActiveX control via JavaScript. We will simply display the data returned by the methods and property in alert boxes. The below code demonstrates how we can access the properties in the ActiveX control.


This will work like a charm in Internet Explorer but may need an API plugin for other browsers like FireFox or Safari.

Summary

In this article you have seen how we can increase the functionality of our web application by implementation of ActiveX controls in C#. The practical applications of ActiveX are limitless especially for graphics and multimedia.

Writing an ActiveX Control in .NET

Writing an ActiveX Control in .NET

 
In this example, I will walk you through creating an ActiveX control that will show a simple user interface and accept input from a web page.
 
Technologies: .NET 1.0/1.1,Visual C# .NET
 

Software developers have used ActiveX controls on their web pages to add advanced functionality to the web experience. With my migration from a Visual Basic 6 world to a Microsoft .NET C# world, I had some question as to how I can create an ActiveX control with .NET. After some research I found out that the solution is really quite simple. Create a Windows control project in Visual Studio .NET and expose an interface to the COM world.

In this example, I will walk you through creating an ActiveX control that will show a simple user interface and accept input from a web page. This process will involve the following steps:

  1. Create an assembly (class library project) that contains an item of type User Control.
  2. Expose an interface for the control.
  3. Embed the user control into a web page.
  4. Transfer data from a web form to the control and display the data on the control.

Step 1: Create an assembly.

You can use the example provided for download, or simply create your own project from scratch. In this section I will outline everything you need to do in order to properly create your assembly.

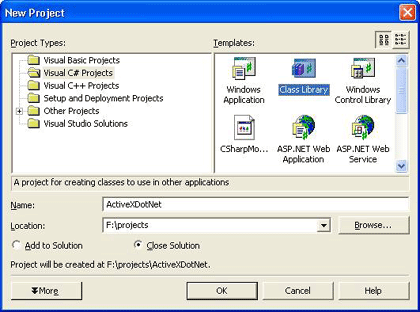
First, you create a new project of type Class Library. Name the class library ActiveXDotNet.


Once the project is created, delete the Class1.cs file from your project as it will not be necessary. Next, add a User Control to the project by right clicking on the project in your solution explorer, choose Add, then User Control. Name your user control myControl.


On the user control, add some UI elements, and a text box control named txtUserText. The txtUserText control will display the user data that is typed into the web form. This will demonstrate how to pass data to your User Control.

When you are done adding your user interface to the control we now have to add a key element to the control, an Interface. The interface will allow COM/COM+ objects to know what properties they can use. In this case, we are going to expose one public property named UserText. That property will allow us to set the value of the text box control.

Step 2: Expose the Interface for the control.

First, create a private String to hold the data passed from the web form to the control:

private String mStr_UserText;

Place this String just inside the Class myControl.

Next, we will create a public property. The web page will use this property to pass text back to your control. This property will allow reading and writing of the value mStr_UserText.

public String UserText
{
get { return mStr_UserText; }
set
{
mStr_UserText =
value;
//Update the text box control value also.
txtUserText.Text = value;
}
}

In this example, you will note the extra code in the set section of the public property. When a value is passed from the web form to the control we will set the private String value equal to the value passed to the property. In addition, we are simply going to modify the value of the Text Box control directly. Typically you would NOT do this. Instead, you would raise an event and then validate the data being passed by examining the private variable mStr_UserText. Then you would set the value of the Text Box Control. However, that would add significant code to this example and for simplicity sake I am omitting that security precaution.

Now that you have a public property that .NET assemblies can use, you need to make that property available to the COM world. We do this by creating an Interface and making the myControl class inherit the interface. This will allow COM objects to see what properties we have made available.

Your code will now look like this:

namespace ActiveXDotNet
{
public interface AxMyControl
{
String UserText {
set; get ; }
}
public class myControl : System.Windows.Forms.UserControl, AxMyControl
{
private String mStr_UserText;
public String UserText
{
get { return mStr_UserText; }
set
{
mStr_UserText =
value;
//Update the text box control value also.
txtUserText.Text = value;
}
}
...

Notice that we now have an interface defined, the interface tells COM/COM+ that there is a public property available for use that is of type String and is readable (get) and writeable (set). All we do now is have the Class myControl inherit the interface and viola! We have a .NET assembly that acts like an ActiveX Control.

Step 3: Embed the user control in a web page.

The last thing we do now is use the control in an example web page.

<html>
 <body color=white>
  <hr>  
      <font face=arial size=1>
       <OBJECT id="myControl1" name="myControl1" classid="ActiveXDotNet.dll#ActiveXDotNet.myControl" width=288 height=72>
       </OBJECT>
     </font>  
     <form name="frm" id="frm">
       <input type="text" name="txt" value="enter text here"><input type=button value="Click me" onClick="doScript();">
      </form>
  <hr>
 </body> 
<script language="javascript">
      function doScript()
       {
        myControl1.UserText = frm.txt.value;
       }
</script>
</html>

You will notice in the HTML code above, that you call your .NET assembly very similar to an ActiveX control; however there is no GUID, and no .OCX file. Your CLASSID is now the path to your DLL and the Namespace.Classname identifier. Refer to the code above to understand the syntax of the CLASSID object tag property. Place the HTML file and your DLL in the same directory on your web server and navigate to the HTML document. (Do not load the HTML document by double clicking on it, navigate to it in your browser by using the Fully Qualified URL.) *NOTE: You might need to add your web server to your Trusted Sites list in your Internet Explorer browser.

Step 4: Transfer data from the web form to the user control.

When you load the HTML page, your control should load into the page and you will see a web form with a text box and a button. In this example, if you type some text into the text box and click the button, it will use JavaScript to send the text from the web page form, to the User Control that you just built. Your User Control will then display the text in the Text Box control that I on the form.

Where do I go from here?

There are many issues that you should investigate in order to properly create User Controls that work on a web page. .NET Security plays a big part in what you can actually do within the confines of your code. You should also investigate code signing your control.